Last Updated: May 15, 2024
The LinkedIn Sales Navigator is a great prospecting tool for building an extensive list of potential connections. With Sales Navigator, you can build a list of potential connections by filtering leads based on several criteria, including geography, industry, function, and seniority. Talk about comprehensive!
This nifty tool can be a game-changer in developing a pipeline of potential connections and growing your list of prospects. With the Sales Navigator, you can build networks and communities tailored to your target market and audience. Each connection will carry more value and will, in turn, derive more value from the networks.
In this blog, we aim to help you take full advantage of the LinkedIn Sales Navigator by simplifying its workflow.
We’ll cover the following topics in this article:
- Why Sales Navigator?
- Is Sales Navigator Worth Your Investment?
- Decoding the Mechanics of Sales Navigator
- How to Use Sales Navigator for Networking
Why Sales Navigator?
LinkedIn Sales Navigator is an indispensable tool for expanding your reach, cultivating a thriving network, and generating a rich pipeline of relevant leads. Let’s explore why you should choose this unique tool from LinkedIn:
Targeted Search + Tailored Messages = Great Pipeline

Sales Navigator enables you to build your pipeline with targeted leads and accounts. With relevant and updated information about your prospects, you can tailor your messages to their roles and interests. You can focus your searches on geography, roles, industry, company, and seniority level. Plus, you can save targeted searches to create custom lists to share with your team, making your work more efficient.
Here are some more specific search parameters that you can use:
- People who have experiences similar to yours
- People who have been active on LinkedIn in the last 30 days
- People who have moved from their current jobs in the past three months
- People who have included TeamLink intro in their bio
- People who follow your company’s page on LinkedIn
The best part? You can save all these searches for later use!
Pro tip: Save the targeted searches to create custom lists, which you can share with your team if needed.
Access to InMail and InMail Credit
One of the most critical features of Sales Navigator is InMail, valuable to those searching for leads. The tool provides 50 InMail credits each month and has many other features, including an inbox, which enables you to follow up with your prospector or send them invites for 121 connections. InMail can become your email campaign for reaching people who have not opted-in to your communication, and it has a better chance of getting their attention than regular email channels.
Pro tip: Create InMail templates and use different ones for different ‘campaigns’ and target lists.
Automate Your Outreach
Sales Navigator automates your outreach efforts in several ways. You can put alerts for any change in the lists you have created, allowing you to notice when a prospect changes their job or updates their profile.
CRM Integration
You can also integrate a CRM and make use of custom lists and tools like bulk emails and multiple recommendations. This will help you streamline the process of transferring relevant leads, activity or any other information from Sales Navigator to your CRM.
Pro tip: Use LinkedIn automation tools like Octopus CRM, Dripify, and Kennected to keep your sales pipeline full.
Is Sales Navigator Worth Your Investment?
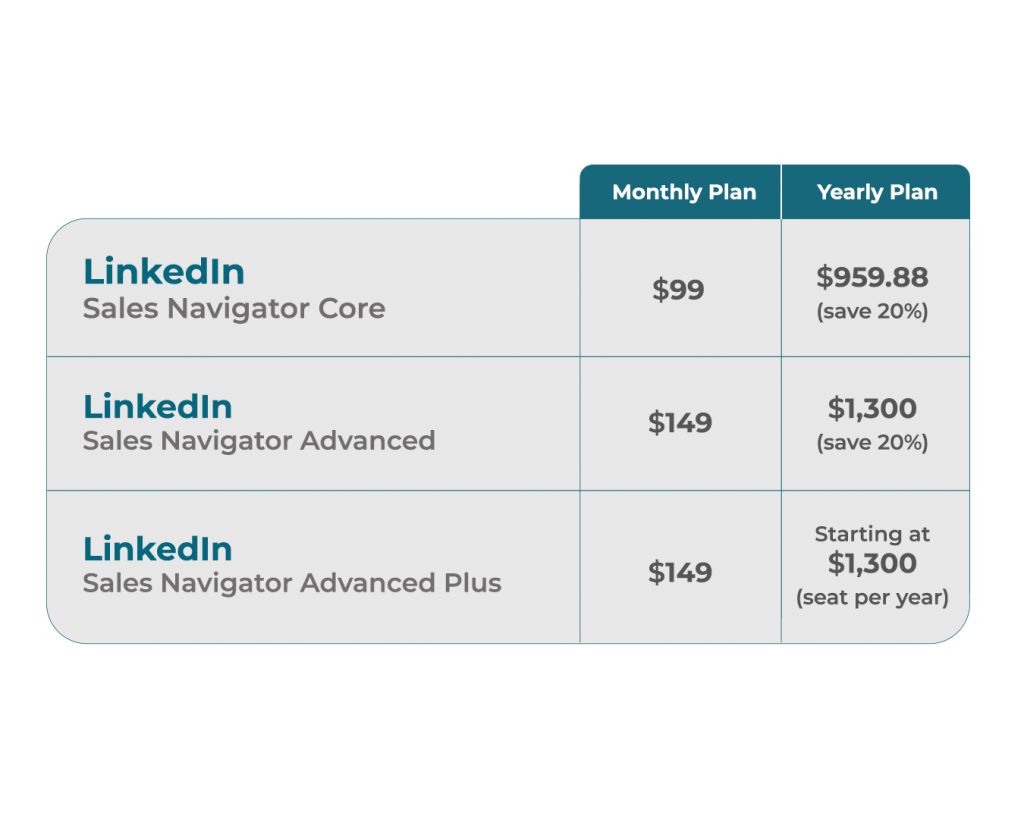
The Sales Navigator pricing might just scare one off, and leave them to think: is it truly worth its weight in gold?

The answer is a resolute “yes” – but only if you use the tool effectively. Too many users barely scratch the surface, essentially wasting the license. So, let’s familiarize you with the workings of Sales Navigator.
Decoding the Mechanics of Sales Navigator
Sales Navigator isn’t just another tool, it’s more of a strategic ally in your quest for prospects. With prospect tagging and a quota of 50 InMails, it definitely hits the bullseye! Whether you’re looking to target a select few or casting a wider net, its industry-specific filters will streamline your hunt.
And that’s not all. Sales Navigator illuminates common ground with your leads, empowering you to craft tailored messages that resonate. With insights into company updates and a stash of InMail ammunition, you’re well-armed to connect and engage with precision.
How to Use Sales Navigator for Networking
The best way to use LinkedIn Sales Navigator is to start by setting your goals and KPIs. Define your goals, fine-tune your profile, and synchronize with your sales strategy. Then, craft your playbook – a list of outreach templates and daily rituals. With your groundwork laid, it’s time to fire up Sales Navigator and start the hunt.
Here’s a quick Sales Navigator guide to help you breeze through your networking:
Step 1: Set Your Preferences
Customize your experience by configuring preferences and alerts. Tailor the platform to your needs and let the recommendations roll in.

Step 2: Harness Advanced Search
Say goodbye to basic searches and embrace the power of filtration. Pinpoint prospects by region, industry, function, and seniority, refining your hunt with surgical precision.

Step 3: Craft Compelling InMails
In the world of InMails, brevity is key. Craft concise, compelling messages that prompt action. Pose a pertinent question, offer assistance, and extend an invitation – the recipe for a high response rate.
Here’s a potential flow to follow while writing InMails to get a high response rate:
- Ask a relevant question.
- Let them know how you can help.
- Offer proof, if needed.
- Set up a meeting.
Step 4: Expand Your Reach with ‘View Similar’ option
Dive deeper into the rabbit hole by exploring similar profiles. Extend invitations, initiate one-to-one chats, or beckon them to chapter meetings.

Step 5: Unleash the Power of SmartLinks
Track your leads’ activity and decode their interests with SmartLinks. Build a blueprint of their behavior, paving the way for more meaningful interactions.
Time to unleash Your Full Potential with Sales Navigator
With over a billion profiles at your fingertips, Sales Navigator is your gateway to a treasure trove of high-potential prospects. To use it effectively, you must forge habits, craft strategies, and leverage LinkedIn’s tools to the best of your advantage. After all, in the realm of networking, success favors the bold.
If you have any further questions, reach out to us here!
